Librería de firmado (PHP)
Librería de firmado de transacciones para el API de Pago Fácil utilizando PHP
<p align="center">
<a href="" rel="noopener">
<img height=200px src="https://s3-us-west-2.amazonaws.com/assets.pagofacil.cl/images/1-Logo_cuadrado.png" alt="Pago Fácil SpA Examples">
</a>
</p>
<h3 align="center">
<a href="https://github.com/PSTPAGOFACIL/sdk-apis-php-signature" target="_blank">@pstpagofacil/sdk-apis-php-signature</a>
</h3>
<div align="center">
[](https://github.com/PSTPAGOFACIL/sdk-apis-php-signature/)\
[](https://github.com/PPSTPAGOFACIL/sdk-apis-php-signature/issues)\
[](https://github.com/PSTPAGOFACIL/sdk-apis-php-signature/pulls)\

</div>
***
# pstpagofacil/sdk-apis-php-signature
## Tabla de contenido
* [Acerca de](#about)
* [Empezando el proceso](#getting_started)
* [Uso](#usage)
## Acerca de <a name="about"></a>
Esta libreria the ayudará con firmar el mensaje que haz mandado al server de la API de Pago Fácil.
## Empezando el proceso <a name="getting_started"></a>
Estas intruccioneste darán una copia del proyecto funcional en tu computadora personal con el proposito de que le realizes pruebas de calidad y desarrolles en esta.
### Instalación con Composer
Puedes instalarlo usando Composer usando el siguiente comando:
composer require pstpagofacil/sdk-apis-php-signature
## Uso<a name="usage"></a>

A continuación adjuntamos un ejemplo de Creación y Envío de Transacción usando nuestra librería de Firmado.

```php Creating & Posting Trx
<?php
require_once(__DIR__ . '/vendor/autoload.php');
use PSTPagoFacil\SignatureHelper; //using Pago Fácil SignatureHelper Library

$tokenService = 'TOKEN_SERVICE'; // put your Token Service here
$tokenSecret = 'TOKEN_SECRET';  // put your Token Secret here
$x_reference = (int) microtime(true); //Just a random number as an example
$x_session_id = (int) microtime(true); //Just a random number as an example
$sHelper = new SignatureHelper($tokenSecret);

// Building the trx

$trxBody = [
    "x_account_id"=> $tokenService,
    "x_amount"=> 1000,
    "x_currency"=> "CLP",
    "x_reference"=> $x_reference,
    "x_customer_email"=> "[email protected]",
     "x_url_complete"=> "https://postman-echo.com/post",
    "x_url_cancel"=> "https://postman-echo.com/post",
    "x_url_callback"=> "https://postman-echo.com/post",
     "x_shop_country"=> "CL",
    "x_session_id"=> "$x_session_id"
];

// Signing trx with

$firma = $sHelper->signPayload($trxBody);
$x_signature = $sHelper->signPayload($trxBody);
$trxBody["x_signature"] = $x_signature;

// Posting Signed trx with Pago Fácil SignatureHelper Library
$payload = json_encode($trxBody);
// print_r($payload); //payload ready to be sent

$curl = curl_init();

curl_setopt_array($curl, [
  CURLOPT_URL => "https://apis-dev.pgf.cl/trxs",
  CURLOPT_RETURNTRANSFER => true,
  CURLOPT_ENCODING => "",
  CURLOPT_MAXREDIRS => 10,
  CURLOPT_TIMEOUT => 30,
  CURLOPT_HTTP_VERSION => CURL_HTTP_VERSION_1_1,
  CURLOPT_CUSTOMREQUEST => "POST",
  CURLOPT_POSTFIELDS => $payload,
  CURLOPT_HTTPHEADER => [
    "Accept: application/json",
    "Content-Type: application/json"
  ],
]);

// Requesting the Response
$response = curl_exec($curl);

$err = curl_error($curl);

curl_close($curl);

if ($err) {
  echo "cURL Error #:" . $err;
} else {
    $jsonResponse = json_decode($response);

    print_r ($jsonResponse); //here you can see the JSON Response Object

/*  0 gateway
    1 webpay
    2 khipu max 5mm
    3 multicaja error
    4 pago 46
    5 mach
*/

    // $url = $jsonResponse->data->payUrl[0]->url; // here you choose your payUrl
    // echo $url,"\n\n";
}
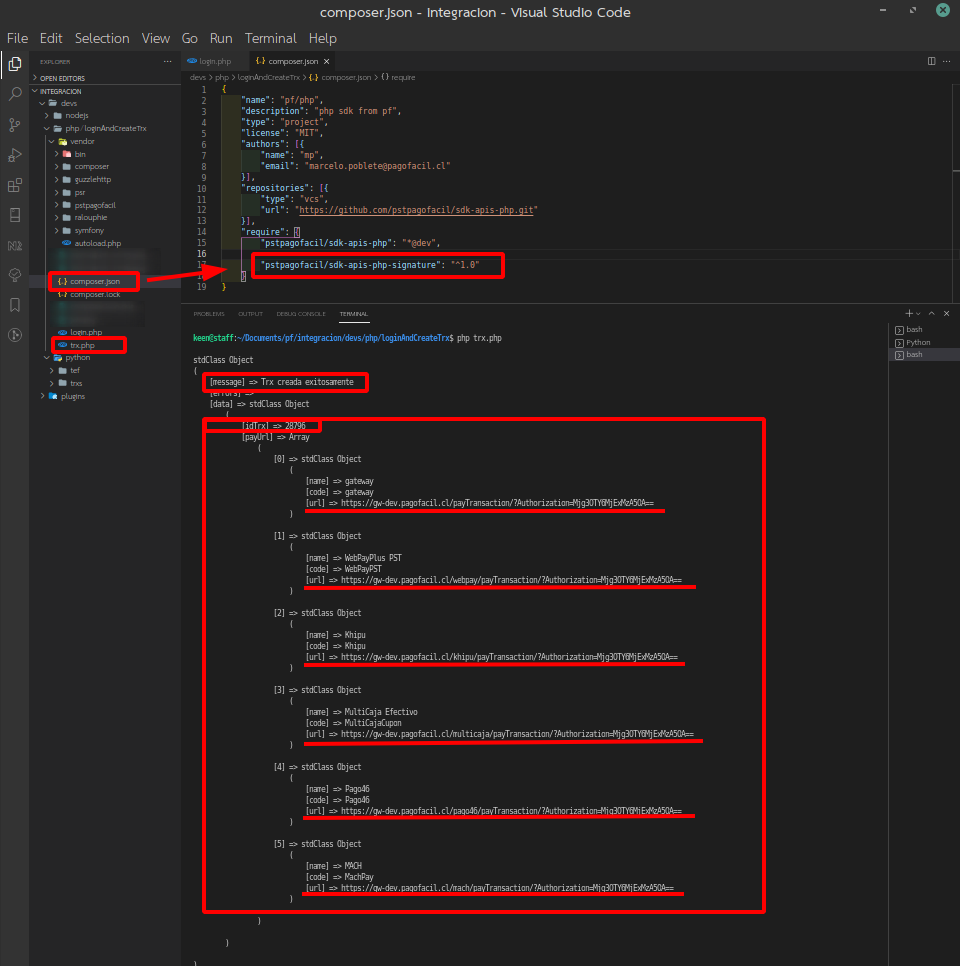
Ejemplo de Uso de la Librería de Firmado
A continuación adjuntamos ejemplo exitoso de uso de la Librería de Firmado para PHP al crear y enviar una transacción y se muestra el Response que recibirás.

Updated 5 months ago